Japan eSIM vs Physical SIM in 2026: How to Choose Before You Fly

This post may contain affiliate links. If you book or buy through them, we may earn a commission at no extra cost to you.
Every trip to Japan now starts with the same small decision at checkout: eSIM, physical SIM, or pocket Wi-Fi. It looks trivial until you land at Narita at 9pm, discover your hotel’s directions are in a Google Maps tab that won’t load, and realise the free airport Wi-Fi ends at the platform. This guide is written for travellers flying in from outside Asia, and it is current as of August 2026. Data products change pricing constantly, so where a figure could not be confirmed against a primary source, it is deliberately left out rather than guessed.
The short answer: in 2026, most visitors should buy an eSIM
- It activates before you fly. You install the profile at home on your own Wi-Fi and switch it on when the wheels touch down. No queue, no counter, no hunting for a vending machine at 23:00.
- You keep your home number. Your physical SIM or primary eSIM line stays in the phone for banking SMS codes, your airline’s rebooking texts, and two-factor prompts. This is the single biggest practical advantage, and Apple’s own device documentation confirms modern iPhones support multiple eSIM profiles with one active alongside another line[7].
- Nothing to lose or return. No fingernail-sized plastic chip to store in a hotel room, no rental device to post back, no deposit.
The three exceptions where this advice flips are: an older or carrier-locked handset that cannot take an eSIM, a trip where you genuinely need a Japanese phone number, and a group travelling together who can share one connection. Each is covered in detail below.
eSIM vs physical SIM vs pocket Wi-Fi at a glance
US buyers, note: every iPhone model sold in the United States from the iPhone 14 onward ships without a SIM tray, so “fall back to a physical SIM” is not an option on those handsets — check your model against Apple’s device list before planning around a physical SIM[7].
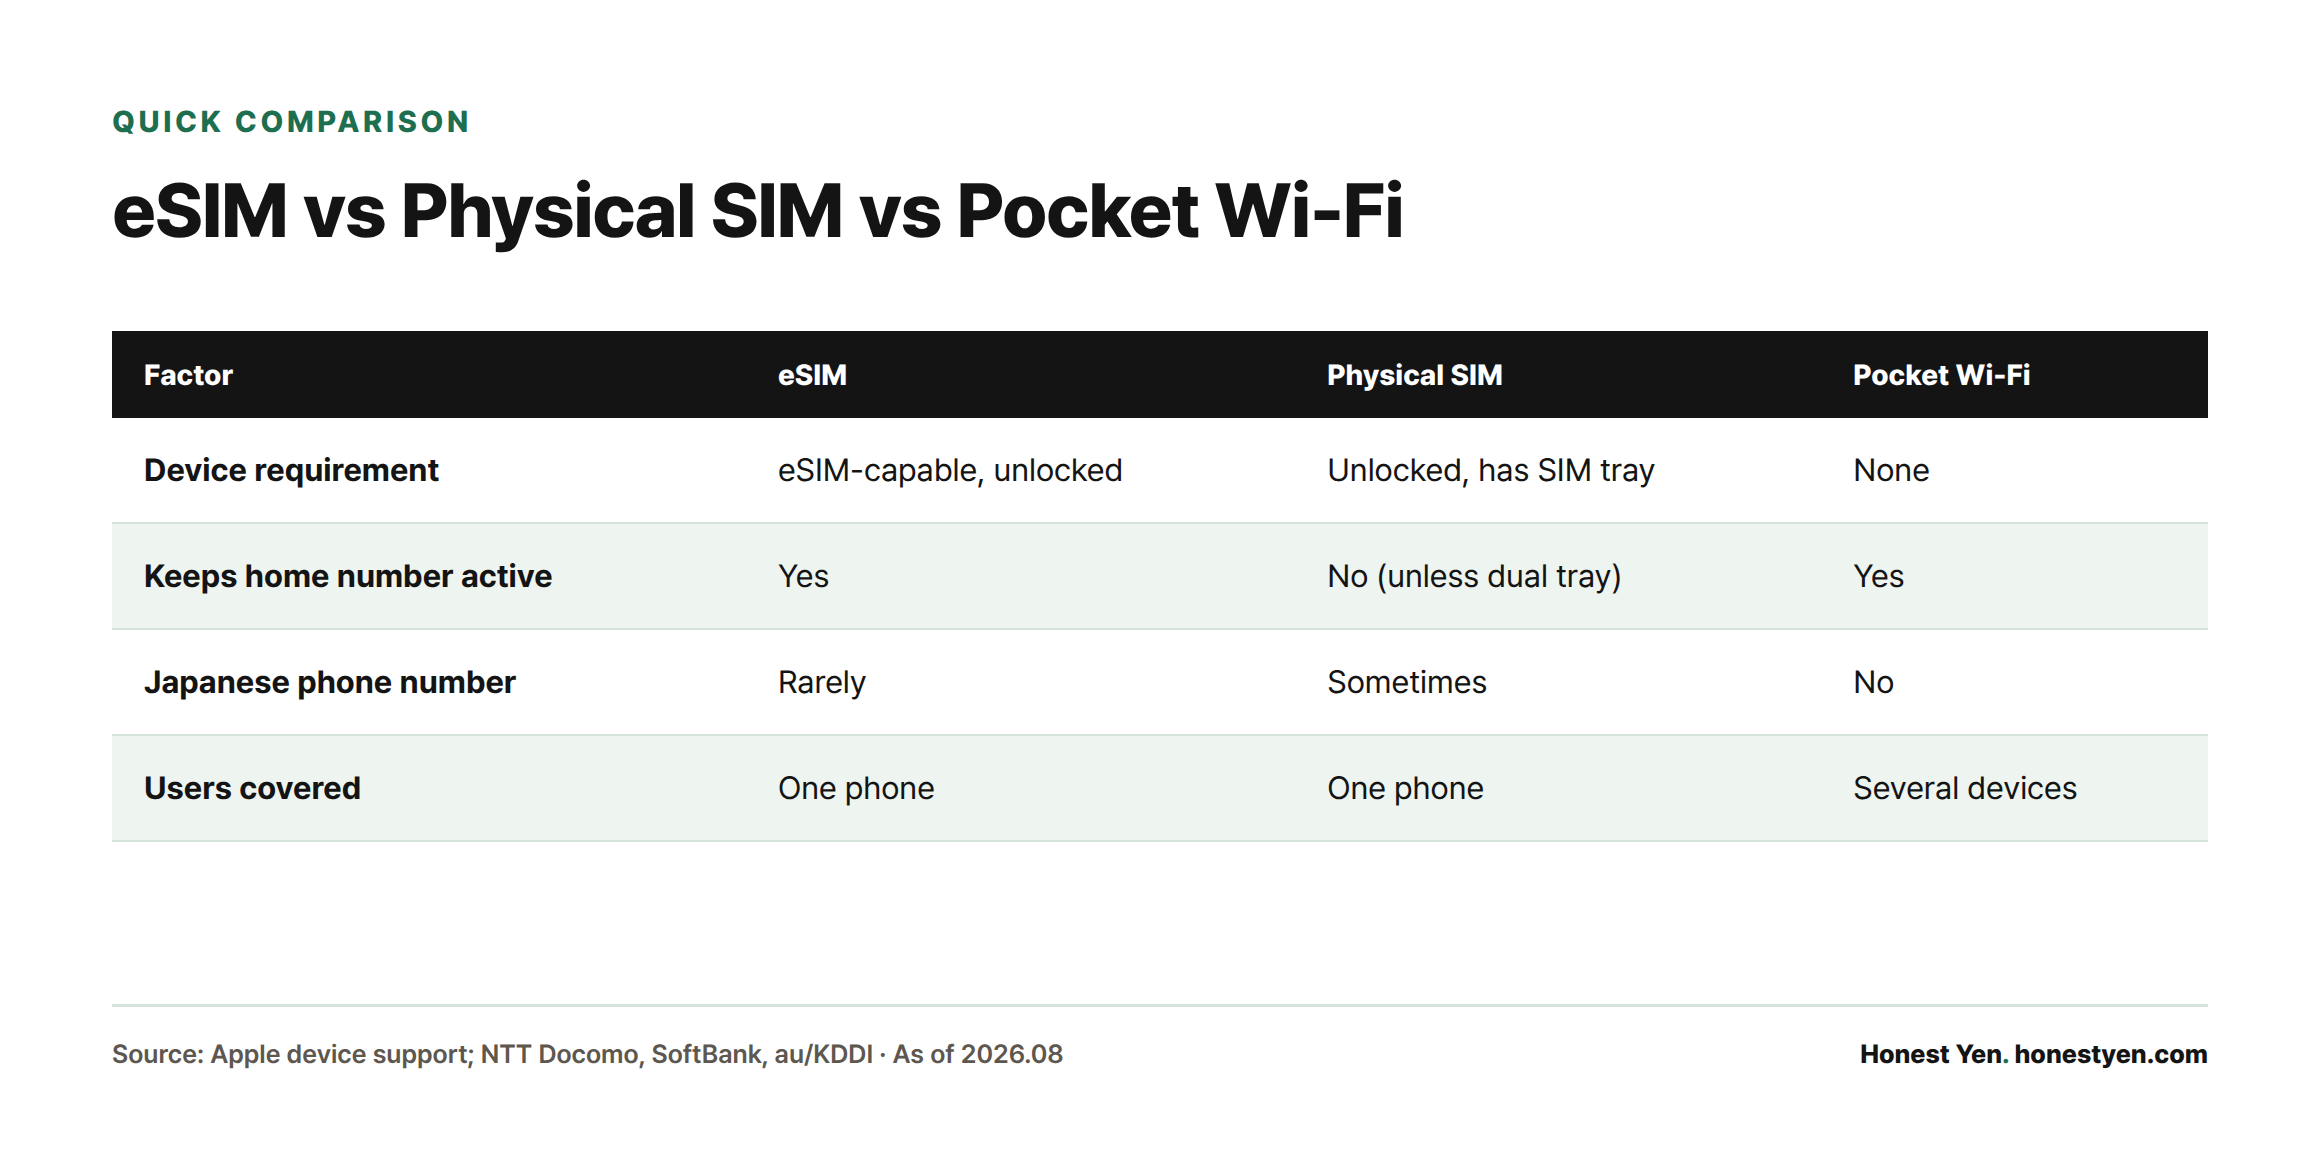
Prices for travel data in Japan move week to week and differ by vendor, so the table compares the things that don’t change — the mechanics you’re actually choosing between. Check live pricing at the point of purchase.
| Factor | eSIM | Physical SIM | Pocket Wi-Fi |
|---|---|---|---|
| Where you get it | Emailed QR code before departure | Posted to you, or collected at an airport counter or vending machine[2][3][9] | Airport counter pickup or hotel delivery |
| Time to working data on arrival | Minutes — toggle the line on after landing | Longer if collecting on arrival; depends on counter queues | Longest — counter pickup plus paperwork |
| Device requirement | eSIM-capable, carrier-unlocked handset[7] | Any unlocked phone with a SIM tray | None — any Wi-Fi device |
| Keeps your home number active | Yes | No, unless your phone has dual trays | Yes |
| Japanese phone number | Rarely (most are data-only) | Sometimes, on voice-enabled products | No |
| Users covered | One phone | One phone | Several devices at once |
| Extra baggage | None | SIM ejector pin, chip storage | A device and its charger to carry and return |
Why most tourist products are data-only
Japan’s telecom sector is regulated by the Ministry of Internal Affairs and Communications, and identity-verification rules apply to voice-capable subscriptions[8]. That is the underlying reason so many visitor SIMs and eSIMs sell data only: it removes the paperwork. If a listing does not explicitly say it includes a Japanese number, assume it does not.
When an eSIM is clearly the right call
Short and mid-length city trips
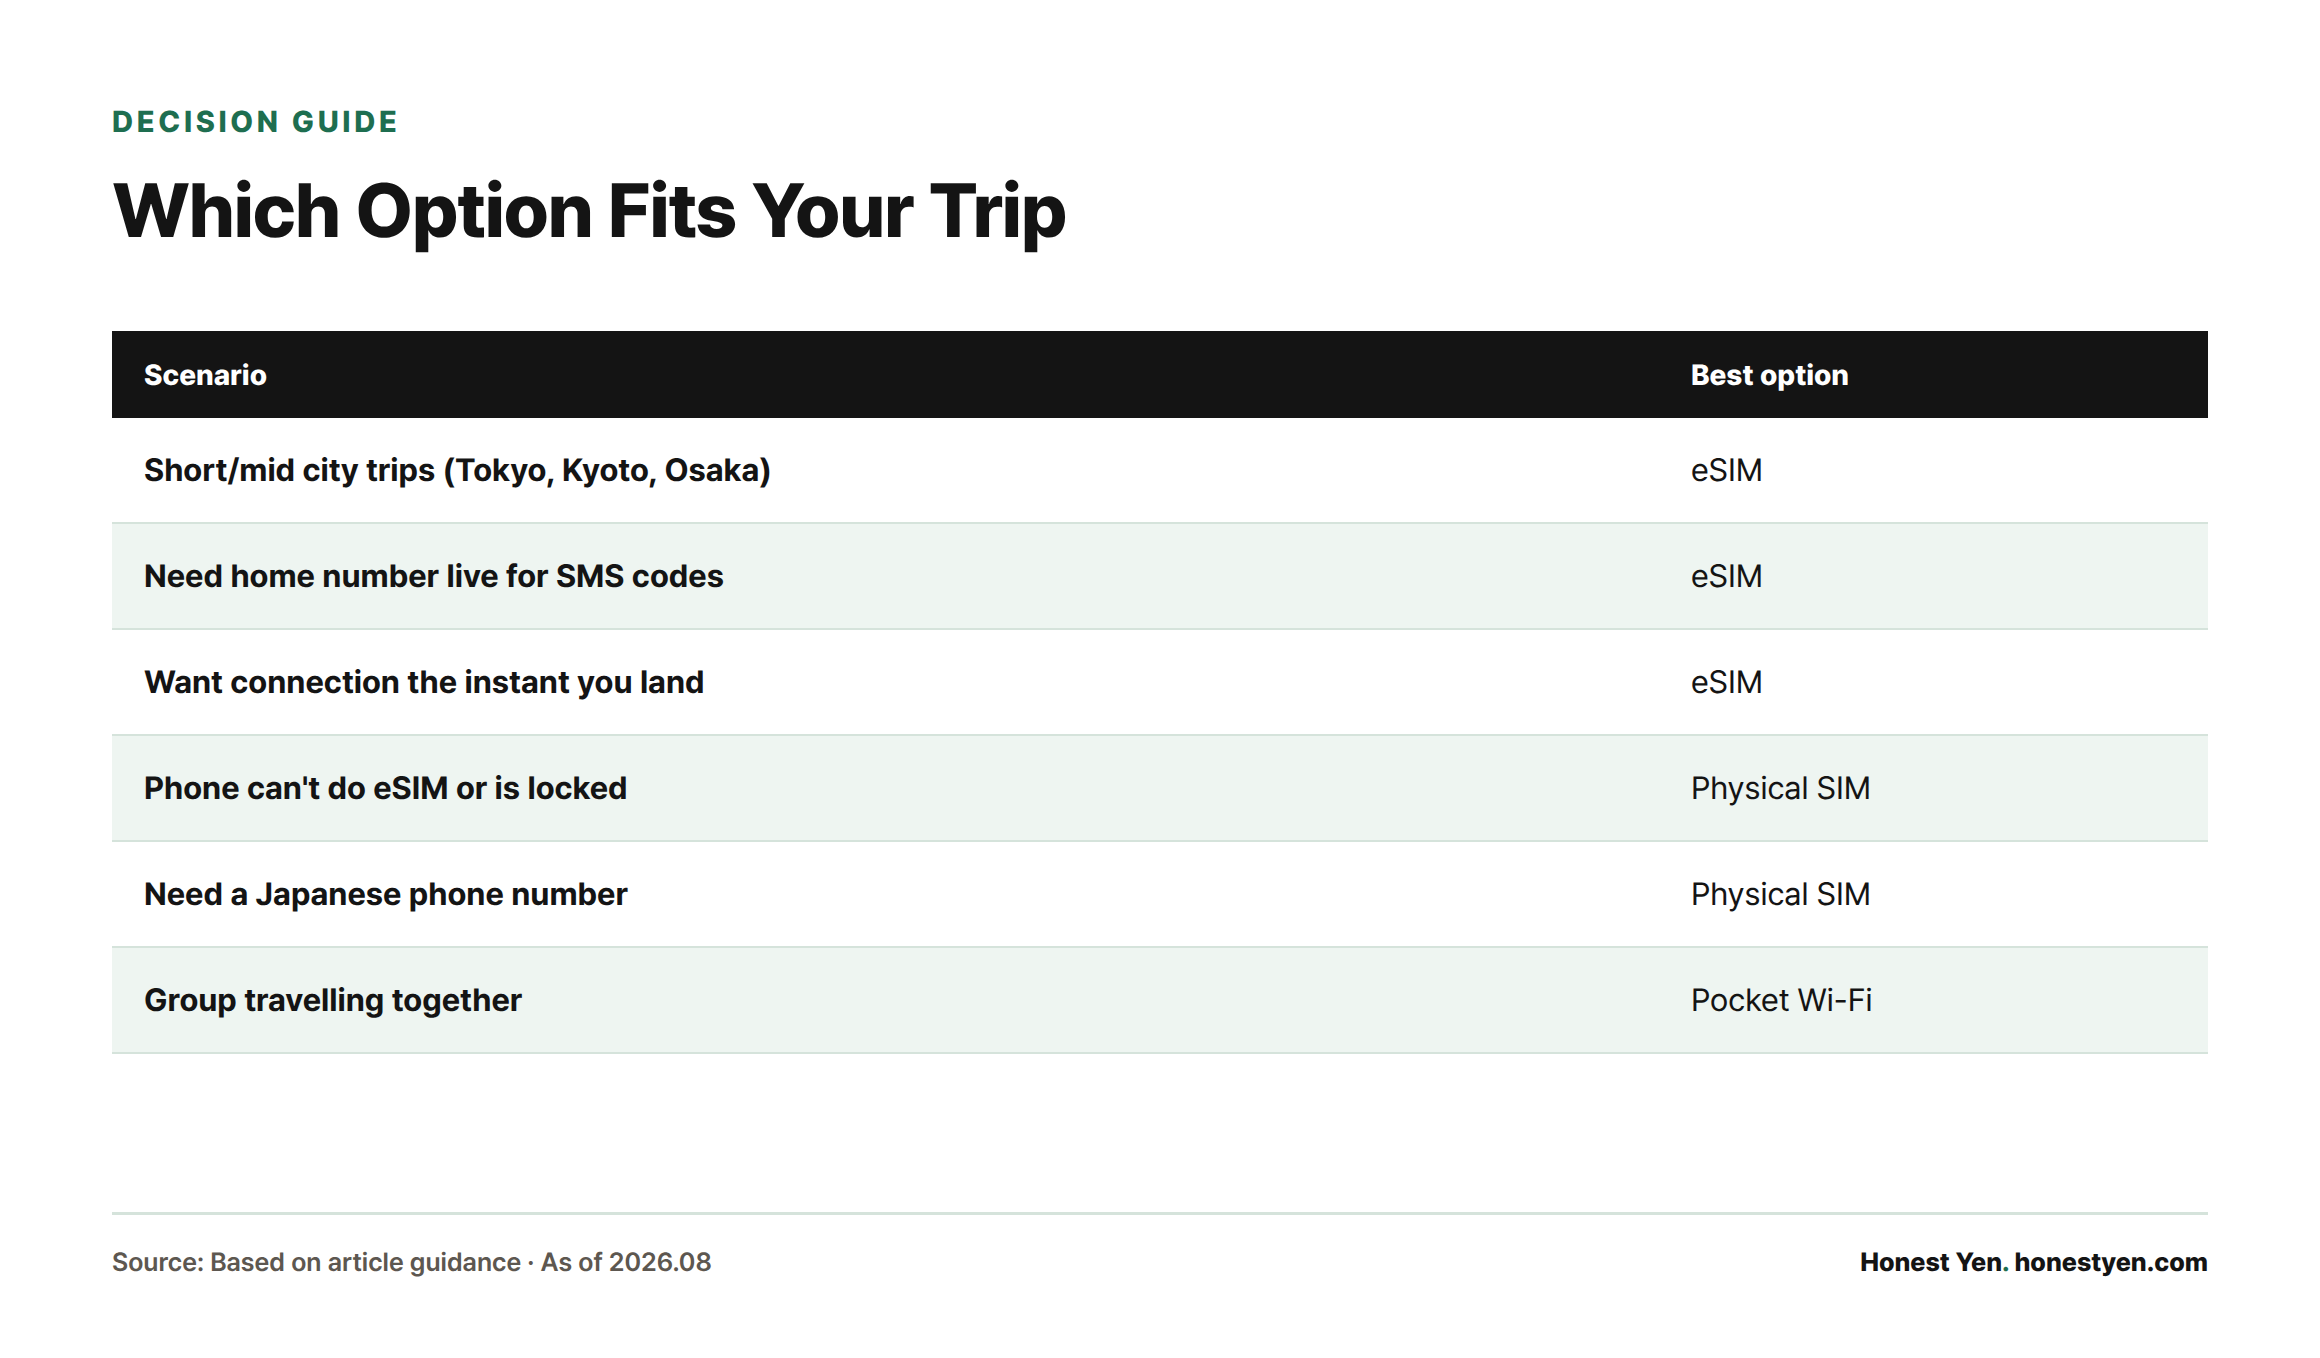
If your itinerary is Tokyo, Kyoto, Osaka and a couple of day trips, you are almost never far from coverage, and your data use is maps, translation, train times and a few uploads. An eSIM handles this with no logistical overhead.
You need your home number live
This matters more than most first-timers expect. Japan still runs on more cash and more paperwork than Western visitors assume, and the moments you need an SMS code — authorising a foreign card charge, confirming a rail booking, resetting an app password at a ticket machine — are exactly the moments you cannot swap SIMs in a crowded station.
You want to be connected the instant you land
Immigration and customs at Narita and Haneda are the first places you will want a working connection: to check a train time, message whoever is meeting you, or pull up an address in Japanese for the taxi driver[2][3]. An eSIM already installed removes that entire step.
When a physical SIM still wins
Your phone can’t do eSIM — or is locked
Check this before you buy anything. Apple publishes the list of eSIM-capable models and how to check the setting on your device[7]; Android varies by manufacturer and, importantly, by region — some handsets sold on carrier contracts have eSIM disabled or the device network-locked. A phone still locked to a home carrier will reject a Japanese profile regardless of which type you buy. Contact your carrier for an unlock while you still have time to receive a physical SIM by post.
You need a Japanese number
Relevant if you are booking restaurants that only take phone reservations, arranging a rural minshuku, dealing with a car rental, or staying long enough to need a service that verifies by Japanese SMS. Voice-enabled options are more paperwork but they exist.
Longer stays
Past a few weeks, the maths tends to shift: longer-duration physical SIM products and local plans often price better per day than short-burst tourist eSIMs, and you have time to sort out activation properly.
What actually determines your speed in Japan
Almost every visitor product — eSIM, SIM or pocket Wi-Fi — is riding one of the same national networks operated by NTT Docomo[4], SoftBank[5] or au/KDDI[6]. The vendor is a reseller. That single fact explains most of what travellers report:
- Which host network you’re on matters more than the brand on the invoice. Listings often state the underlying carrier. If yours does, that is the useful detail; check the operator’s own coverage information for the regions on your itinerary[4][5][6].
- Central Tokyo, Osaka and Kyoto are not the test. All three networks are dense in metropolitan areas. Differences show up in mountainous regions, on rural bus routes, on ferries, and in the deep valleys of places like the Kiso or Iya valleys.
- Shinkansen travel is a special case. Long tunnel sections interrupt any mobile connection regardless of vendor. Download offline maps, tickets and entertainment before boarding, rather than blaming the SIM.
- “Unlimited” usually isn’t. Most unlimited products apply a fair-use threshold, after which speeds are reduced for the rest of the day or the plan. Read the throttling clause, not the headline.
Buying and activating, step by step
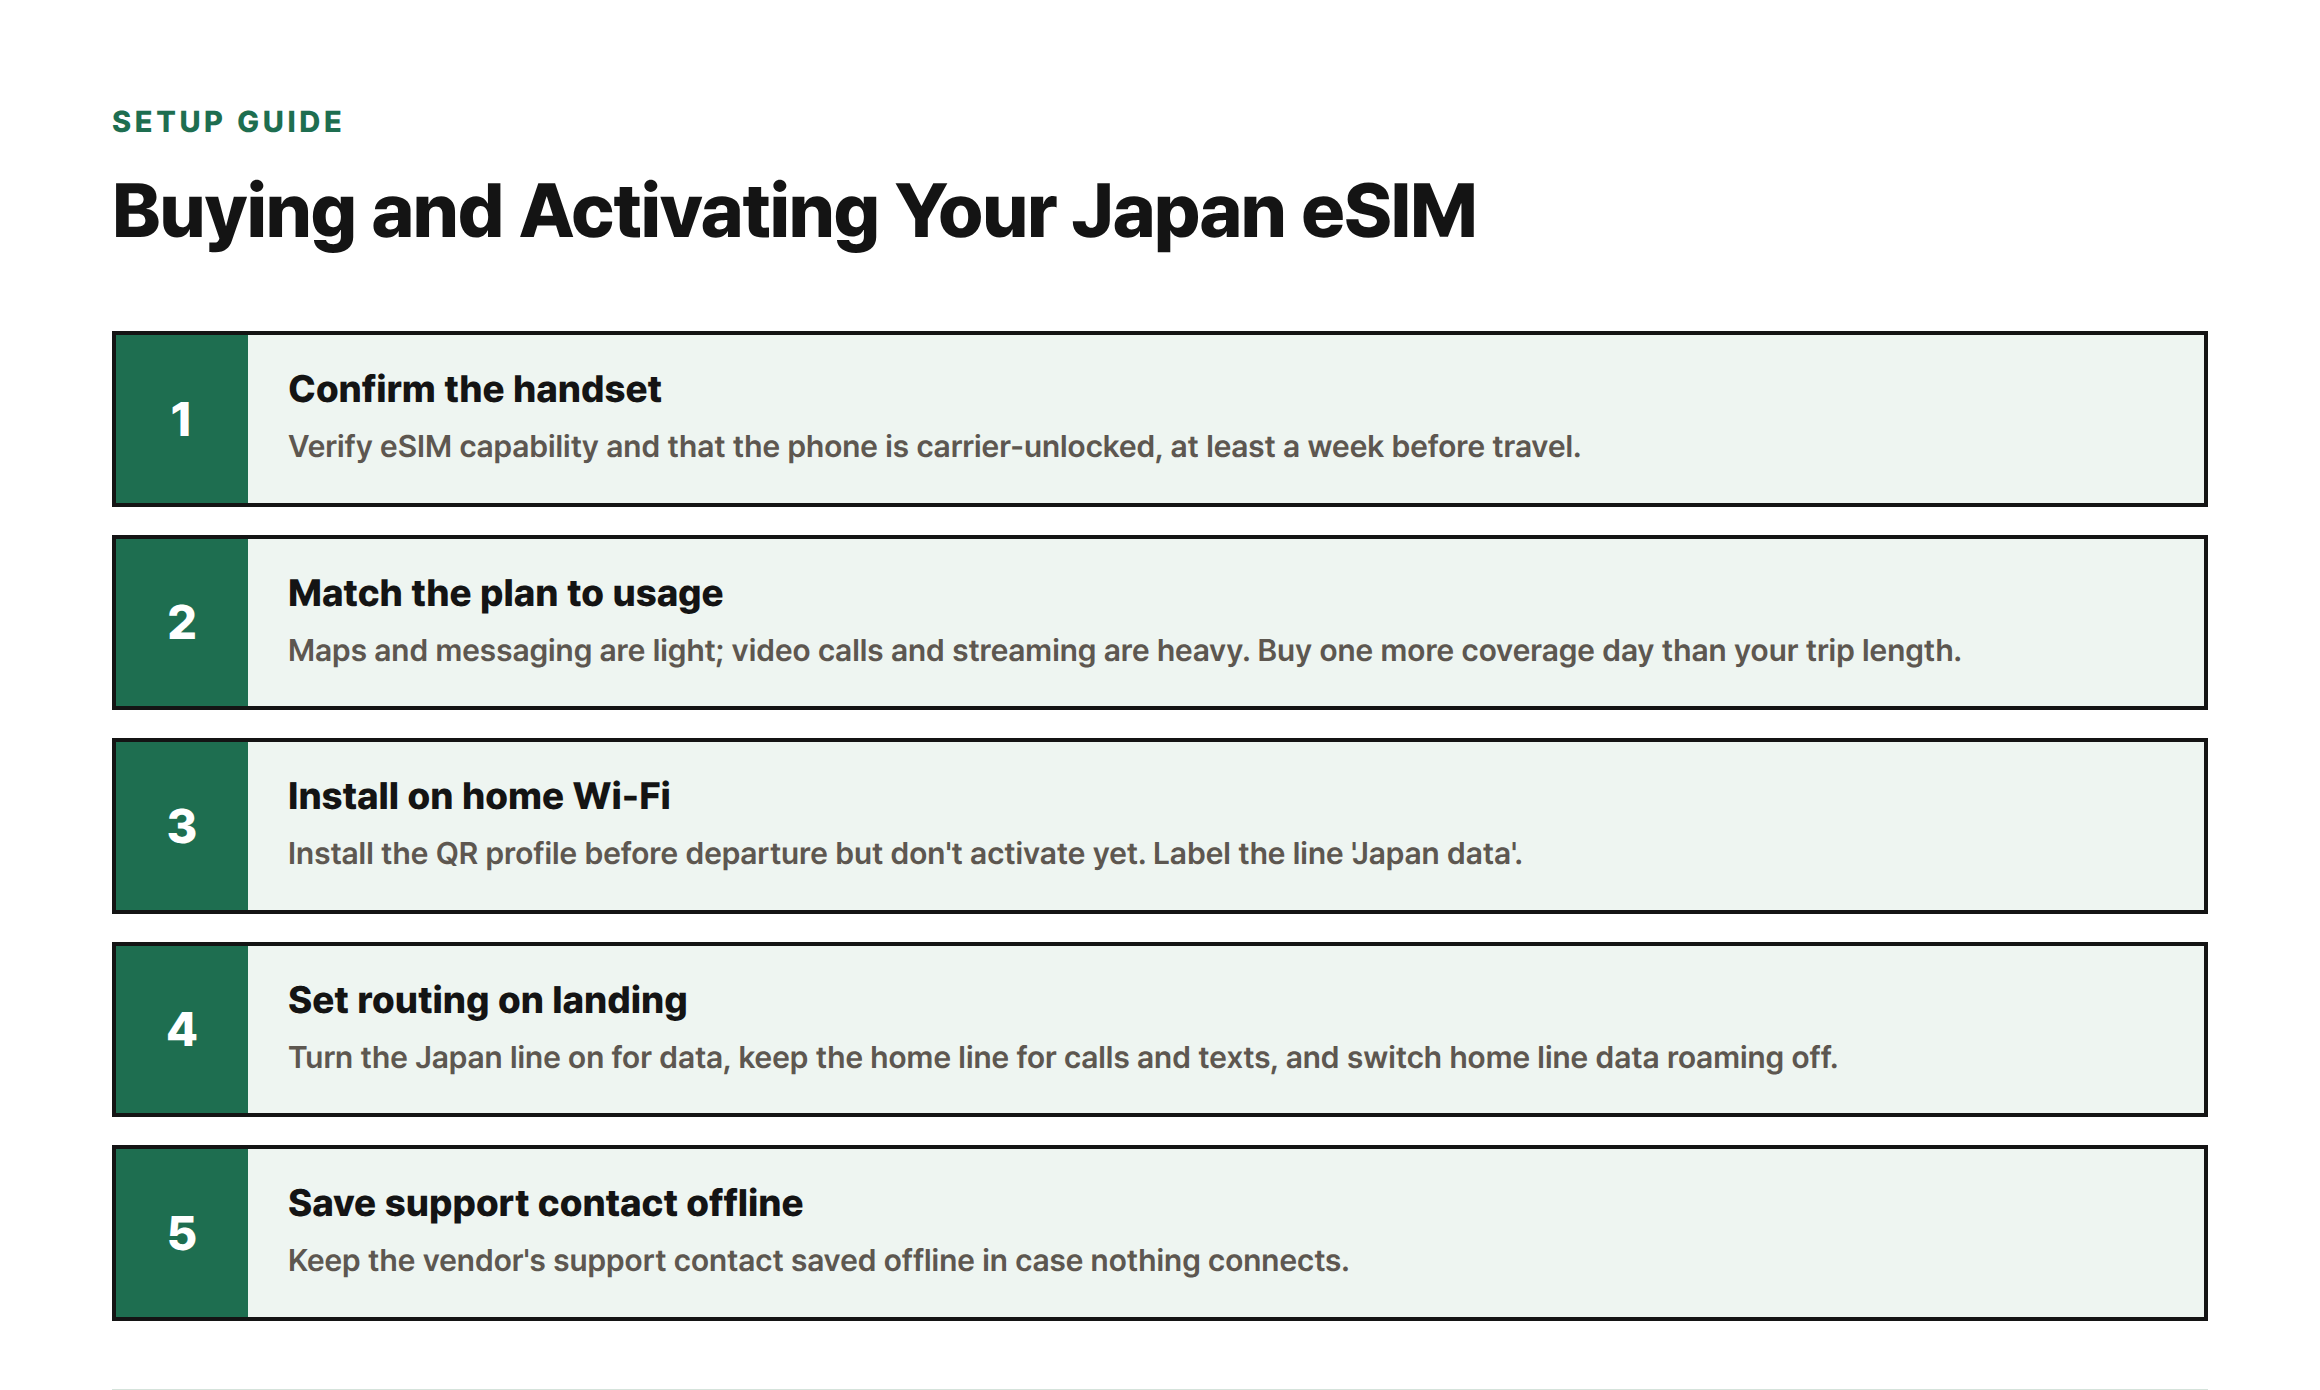
- Confirm the handset. Verify eSIM capability and that the phone is carrier-unlocked[7]. Do this at least a week out.
- Match the plan to real usage. Maps, messaging and translation are light. Video calls home, uploading to social media, and streaming on trains are heavy. Coverage days should exceed your trip length by one, since activation may begin at first connection or on a fixed date depending on the product.
- Install on home Wi-Fi, don’t activate yet. The QR install and the activation are separate. Label the new line clearly — “Japan data” — so you can tell it apart in settings.
- On landing, set the routing. Turn the Japan line on for data, leave your home line on for calls and texts, and switch your home line’s data roaming off. This last step is what prevents an unwelcome roaming bill.
- If nothing connects: toggle airplane mode, restart the phone, then check the APN. Most vendors supply an APN string and instructions; some profiles set it automatically and some do not. Confirm the Japan line is selected for mobile data rather than only being installed.
- Keep the vendor’s support contact saved offline — a support page you can’t load is no use.
Working out your real total cost
- Cost per day, not headline price. Divide the total by your actual trip nights. A cheaper 7-day plan on a 4-day trip is not cheaper.
- Cost per traveller. Pocket Wi-Fi looks expensive against one eSIM and cheap against four. Two people usually favour two eSIMs; families and groups of three or more should price the Wi-Fi device seriously.
- Hidden extras. Rental deposits, insurance waivers, airport pickup fees, return postage, and the cost of a top-up if you run dry mid-trip.
- The cost of your time. An airport counter queue after a long-haul flight has a real price, even if it isn’t on the invoice.
- Your carrier’s own roaming pass is the fourth option people forget. Compare it honestly — sometimes it wins for very short trips, and it needs no setup at all.
Common mistakes and FAQ
Do I still need cash if I have data?
Yes. Contactless payment is widespread in cities but far from universal, particularly at small restaurants, shrines, rural buses and older shops. Data does not replace a stocked wallet.
Can I tether from my eSIM?
Not always. Hotspot use is restricted on some visitor plans, and unrestricted on others. If you plan to share your connection with a laptop or a travelling companion, verify tethering is permitted before buying — this is one of the most common post-purchase complaints.
Will an eSIM help me use IC cards or rail passes?
Indirectly. Mobile IC card provisioning and pass reservation apps need a working connection to set up and top up, and a data line is what makes that possible on arrival. The data plan itself is separate from any rail product you buy.
Is airport Wi-Fi enough for the first hour?
Japan’s major international airports provide visitor Wi-Fi and publish terminal service information including communications counters[2][3][9], so you can usually get online long enough to activate something. Relying on it as your plan, rather than your fallback, is the mistake.
What if I run out of data mid-trip?
Most eSIM vendors sell a top-up against the same profile, which is faster than buying a second product. Check whether yours does before you leave — it is easier to plan for than to solve from a train platform.
One last check before you buy
Read the product’s stated coverage regions against your actual itinerary, not against “Japan”. If your trip includes Hokkaido’s interior, the San’in coast, or the Kii Peninsula, the underlying carrier[4][5][6] matters more than it would for a Tokyo–Kyoto loop. General destination planning resources for regional travel are published by the national tourism organisation[1].